Air Conditioning System Diagnostic: A Complete Guide
Air conditioning (A/C) systems have become an essential part of modern life, providing comfort in vehicles, homes, and workplaces by regulating temperature and humidity. Whether in an automobile or a building, an air conditioning system’s efficiency depends on proper functioning of various components working together. When something goes wrong, a systematic diagnostic process is essential to locate and fix the problem effectively. This article presents a comprehensive overview of A/C system diagnostics, including principles, tools, procedures, and professional best practices.
1. Understanding the Basics of Air Conditioning Systems
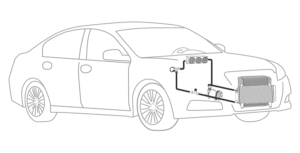
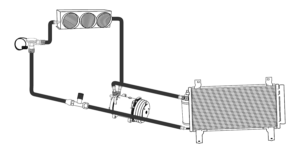
Before diagnosing, it’s important to understand how A/C systems work. Air conditioning operates on the principle of heat transfer—removing heat from one location and releasing it in another. This is achieved through a refrigeration cycle involving compression, condensation, expansion, and evaporation.
Main components:
-
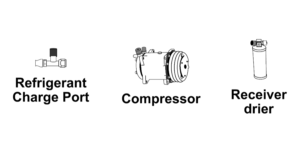
Compressor – Compresses low-pressure refrigerant gas into high-pressure, high-temperature gas.
-
Condenser – Dissipates heat from refrigerant to the outside air, turning it into a high-pressure liquid.
-
Receiver/Dryer or Accumulator – Removes moisture and contaminants from refrigerant.
-
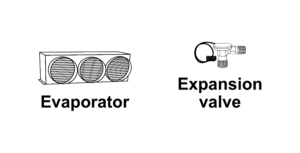
Expansion Valve or Orifice Tube – Controls refrigerant flow into evaporator; causes pressure drop and cooling.
-
Evaporator – Absorbs heat from cabin/room air into refrigerant, cooling the air before it is circulated.
-
Blower Fan – Pushes air through the evaporator and into the space.
-
Refrigerant – The working fluid that absorbs and releases heat.
Understanding how these parts interact is crucial for diagnosing faults accurately.
2. Common Symptoms of Air Conditioning Problems
The first step in diagnostics is recognizing symptoms. Common issues include:
-
Weak Cooling or No Cooling – Could be low refrigerant, compressor failure, blocked condenser, or expansion valve issues.
-
Warm Air from Vents – Often due to refrigerant leaks, faulty compressor clutch, or electrical issues.
-
Intermittent Cooling – May indicate a failing relay, pressure switch problem, or evaporator freezing.
-
Strange Noises – Clicking, grinding, or squealing could come from the compressor, blower motor, or belt.
-
Unpleasant Odors – Usually from mold or bacteria in the evaporator core or duct system.
-
Excessive Moisture Inside Cabin – Possible drain tube clog or evaporator housing issue.
-
Visible Leaks – Oily residue on components often indicates refrigerant leaks.
By associating symptoms with possible causes, technicians can narrow down diagnostic steps.
3. Essential Tools for A/C Diagnostics
Professionals rely on specific tools to diagnose A/C systems accurately:
-
Manifold Gauge Set – Measures high and low system pressures.
-
Digital Thermometer – Monitors vent air temperature.
-
Refrigerant Leak Detector – Identifies refrigerant leaks using electronic or UV dye methods.
-
Vacuum Pump – Removes air and moisture before recharging.
-
Multimeter – Tests electrical circuits and components.
-
Clamp Ammeter – Measures compressor clutch current draw.
-
Infrared Thermometer – Measures surface temperatures without contact.
-
Refrigerant Recovery Machine – Recovers and recycles refrigerant safely.
-
Endoscope Camera – Inspects hard-to-reach areas for leaks or damage.
-
Service Information Systems – Access to manufacturer specifications and wiring diagrams.
Without these tools, A/C diagnostics can become guesswork, leading to incomplete or costly repairs.
4. Step-by-Step Air Conditioning Diagnostic Process
A structured diagnostic procedure ensures efficiency and accuracy.
Step 1: Gather Information from the Customer
Ask about:
-
When the problem occurs (constant or intermittent).
-
Whether cooling stops at idle or highway speeds.
-
Any recent repairs or refrigerant top-ups.
-
Noises, smells, or performance changes noticed.
Step 2: Perform a Visual Inspection
Look for:
-
Damaged hoses, loose connections.
-
Oil stains indicating leaks.
-
Broken or loose drive belts.
-
Dirty or clogged condenser fins.
-
Missing or damaged insulation.
Step 3: Check System Pressure
-
Connect the manifold gauge set to service ports.
-
Compare readings to manufacturer specifications.
-
Abnormally high or low readings can indicate undercharge, overcharge, or restrictions.
Example readings and possible causes:
-
Low Low-Side Pressure, High High-Side Pressure – Restricted expansion valve/orifice tube.
-
Low Both Sides – Low refrigerant charge or major leak.
-
High Both Sides – Overcharged system or condenser airflow blockage.
Step 4: Check Electrical System
-
Use a multimeter to test fuses, relays, and wiring to the compressor clutch.
-
Check for proper voltage at the clutch coil.
-
Inspect pressure switches and temperature sensors.
Step 5: Check Airflow
-
Verify blower motor operation.
-
Inspect cabin air filter for blockages.
-
Ensure condenser fan runs when A/C is on.
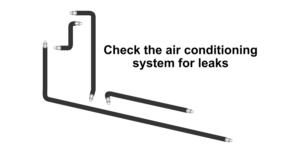
Step 6: Leak Detection
-
Use an electronic leak detector around joints, fittings, and components.
-
Alternatively, inject UV dye and inspect with UV light after running the system.
Step 7: Temperature Measurements
-
Measure temperature at vents with a digital thermometer.
-
Check temperature drop across the evaporator.
-
Compare to ambient temperature for performance evaluation.
Step 8: Functional Testing
-
Operate system at idle and high RPM to test compressor cycling and cooling consistency.
-
Monitor pressure changes with RPM variation.
5. Understanding Diagnostic Pressure Readings
Pressure readings are at the heart of A/C diagnostics.
Normal conditions (approximate values at 80°F ambient):
-
Low Side: 30–40 psi
-
High Side: 150–200 psi
Abnormal examples:
-
Undercharged System: Low pressures on both sides, poor cooling.
-
Overcharged System: High pressures on both sides, compressor strain.
-
Compressor Not Engaging: Equalized pressure across both sides.
-
Restriction in System: High pressure before restriction, low after.
6. Common Air Conditioning Problems and Causes
a) Refrigerant Leaks
-
Caused by worn O-rings, damaged hoses, condenser impact, or corrosion.
-
Symptom: Gradual loss of cooling over time.
b) Compressor Failure
-
Causes: Lack of lubrication, electrical issues, internal wear.
-
Symptom: No cooling, strange noises, metal debris in system.
c) Condenser Blockage
-
Dirt, debris, or bent fins reduce heat transfer.
-
Symptom: High high-side pressure, reduced cooling.
d) Expansion Device Failure
-
Stuck closed → low suction pressure, freezing evaporator.
-
Stuck open → high suction pressure, poor cooling.
e) Electrical Faults
-
Faulty relays, fuses, sensors, or wiring prevent clutch engagement.
f) Evaporator Freeze-Up
-
Caused by restricted airflow or malfunctioning thermostatic switch.
g) Moisture in the System
-
Leads to ice formation and blockage in expansion device.
7. Automotive A/C Diagnostics vs. Residential/Commercial Systems
While principles are similar, differences exist:
-
Automotive Systems
-
Smaller refrigerant capacity.
-
Operate in variable environments.
-
Compressor driven by engine belt.
-
More prone to vibration-related leaks.
-
-
Residential/Commercial Systems
-
Larger capacity and complex ductwork.
-
Stationary installation.
-
Often have split units or central air designs.
-
Include thermostats, zoning controls, and sometimes multi-stage compressors.
-
Diagnostic tools and methods overlap, but automotive work emphasizes portability and speed, while building systems require more static pressure and airflow measurements.
8. Best Practices for A/C Diagnostics
-
Always Recover Refrigerant – Never vent to atmosphere.
-
Follow Manufacturer Specs – Pressures, refrigerant type, and oil amount vary by model.
-
Document Findings – Pressures, temperatures, and repairs for future reference.
-
Replace Receiver/Dryer or Accumulator after Major Repairs – Prevent moisture contamination.
-
Flush the System when Necessary – Remove debris and old oil after compressor failure.
-
Test After Repairs – Confirm operation before returning to customer.
-
Educate Customers – Preventive maintenance like regular filter changes and condenser cleaning.
9. Preventive Maintenance to Reduce Future Failures
-
Regular Filter Replacement – Prevents airflow restriction.
-
Annual Performance Checks – Identifies small leaks early.
-
Keep Condenser Clean – Removes debris blocking airflow.
-
Operate A/C Regularly – Keeps seals lubricated and prevents leaks.
-
Avoid Overcharging – Use correct refrigerant amounts to prevent compressor damage.
10. Safety Precautions During A/C Diagnostics
-
Wear safety glasses and gloves.
-
Avoid skin contact with refrigerant—it can cause frostbite.
-
Be cautious around moving engine parts.
-
Never mix refrigerant types.
-
Use only approved refrigerant recovery equipment.
11. Case Study Examples
Case 1 – Intermittent Cooling in a Sedan
-
Symptoms: Cool air at highway speeds, warm air at idle.
-
Diagnosis: Condenser fan not working; high-side pressure spiked at idle.
-
Repair: Replaced fan motor and relay. Cooling restored.
Case 2 – No Cooling in a Home Split Unit
-
Symptoms: Blower running, but warm air from vents.
-
Diagnosis: Low refrigerant charge; leak detected at evaporator coil.
-
Repair: Replaced coil, evacuated system, recharged with correct refrigerant.
12. Conclusion
Air conditioning system diagnostics is a systematic process that combines mechanical knowledge, electrical testing, and thermal analysis. Whether working on a car, home, or commercial system, success depends on:
-
Understanding the refrigeration cycle.
-
Using the right tools.
-
Following structured diagnostic steps.
-
Applying manufacturer specifications.
-
Maintaining safety and environmental responsibility.
A skilled technician can not only identify the root cause of A/C issues but also provide solutions that restore efficiency and reliability. Regular preventive maintenance and timely inspections remain the best way to minimize costly failures and ensure year-round comfort.
We proudly service the Air Conditioning System Diagnostic needs of customers in Corona, CA |Riverside, CA | Eastvale, CA |Norco CA |Rancho Cucamonga, CA | San Bernardino, CA |Fontana, CA |Chino, CA |and surrounding areas