The starter motor is a crucial component in your vehicle’s ignition system. It is responsible for turning the engine over when you turn the key or press the ignition button, allowing the combustion process to begin. Over time, starter motors can wear out or fail due to electrical issues, mechanical wear, or environmental factors. When this happens, a starter motor replacement becomes necessary.
This guide will cover everything you need to know about starter motor replacement, including:
-
Signs of a Failing Starter Motor
-
Diagnosing Starter Motor Problems
-
Tools and Parts Needed for Replacement
-
Step-by-Step Replacement Guide
-
Tips for Maintaining Your Starter Motor
-
When to Seek Professional Help
By the end of this article, you’ll have a thorough understanding of how to diagnose, replace, and maintain your starter motor.
1. Signs of a Failing Starter Motor
Before replacing your starter motor, it’s essential to recognize the symptoms of a failing unit. Here are the most common signs:
A. Clicking Noise When Turning the Key
-
A single click or rapid clicking sound without the engine cranking usually indicates a starter motor issue.
-
This could be due to a faulty solenoid, weak battery, or poor electrical connections.
B. Engine Cranks Slowly or Doesn’t Crank
-
If the engine turns over sluggishly or not at all, the starter motor may not be receiving enough power or may be worn out.
C. Grinding Noise During Startup
-
A grinding sound suggests that the starter gear (pinion) is not engaging properly with the flywheel.
-
Ignoring this can damage both the starter and the flywheel.
D. Starter Motor Runs Continuously
-
If the starter continues to run after the engine has started, the solenoid may be stuck, or the ignition switch could be faulty.
E. Intermittent Starting Issues
-
If the car starts sometimes but not always, the starter motor may be failing intermittently due to worn brushes or electrical issues.
2. Diagnosing Starter Motor Problems
Before replacing the starter, confirm that the issue is indeed with the starter motor and not another component (e.g., battery, alternator, or ignition switch).
A. Check the Battery
-
A weak or dead battery can mimic starter motor failure.
-
Test the battery voltage (should be 12.6V when off, ~13.7-14.7V when running).
-
Clean corroded battery terminals.
B. Inspect Electrical Connections
-
Loose or corroded wiring to the starter can prevent proper operation.
-
Check the starter relay and fuses.
C. Test the Starter Motor Directly
-
Use a multimeter to check for power at the starter solenoid when the key is turned.
-
If power is present but the starter doesn’t engage, the starter is likely faulty.
D. Tap the Starter (Temporary Fix)
-
Lightly tapping the starter with a wrench can sometimes free a stuck solenoid or brushes.
-
If the car starts after tapping, the starter needs replacement.
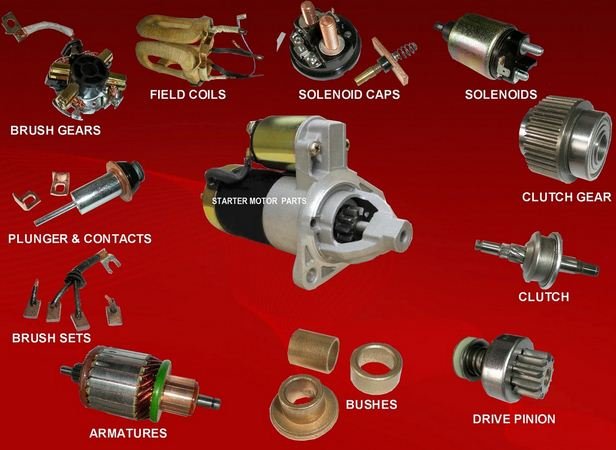
3. Tools and Parts Needed for Replacement
Before starting, gather the necessary tools and parts:
Tools:
-
Socket set & wrenches
-
Screwdrivers (flathead & Phillips)
-
Jack and jack stands (if starter is underneath)
-
Battery terminal wrench
-
Multimeter (for testing)
Parts:
-
New starter motor (OEM or aftermarket)
-
Replacement bolts (if old ones are corroded)
-
Electrical contact cleaner (optional)
-
Threadlocker (optional)
4. Step-by-Step Starter Motor Replacement Guide
Step 1: Disconnect the Battery
-
Always disconnect the negative (-) battery terminal first to prevent electrical shorts.
Step 2: Locate the Starter Motor
-
The starter is usually mounted near the engine’s flywheel (check vehicle manual for exact location).
-
In front-wheel-drive cars, it may be under the engine.
-
In rear-wheel-drive vehicles, it’s often near the transmission bell housing.
Step 3: Remove Electrical Connections
-
Disconnect the positive (+) battery cable from the starter.
-
Unplug the solenoid wire (smaller wire).
Step 4: Unbolt the Starter
-
Most starters are held by 2-3 bolts.
-
Support the starter while removing the last bolt to prevent it from falling.
Step 5: Install the New Starter
-
Position the new starter and secure it with bolts.
-
Reconnect the electrical wires (solenoid wire first, then battery cable).
Step 6: Reconnect the Battery
-
Reattach the negative (-) battery terminal.
Step 7: Test the New Starter
-
Turn the ignition to verify the engine starts smoothly.
-
Listen for unusual noises.
5. Tips for Maintaining Your Starter Motor
To extend the life of your starter motor:
✔ Keep the Battery in Good Condition – Weak batteries strain the starter.
✔ Clean Electrical Connections – Prevent voltage drops due to corrosion.
✔ Avoid Excessive Cranking – Don’t crank for more than 5-10 seconds at a time.
✔ Check the Flywheel – If teeth are damaged, replace it to prevent starter damage.
6. When to Seek Professional Help
While starter replacement is a manageable DIY job, consider professional help if:
-
You’re unsure about diagnosing the issue.
-
The starter is in a hard-to-reach location.
-
The flywheel needs inspection/replacement.
Conclusion
Replacing a starter motor is a straightforward task if you have the right tools and follow proper safety precautions. By recognizing early warning signs, performing accurate diagnostics, and following a structured replacement process, you can save money and avoid unnecessary repairs.
Regular maintenance of your vehicle’s electrical system will help prolong the life of your starter motor and prevent unexpected breakdowns. If in doubt, consult a professional mechanic to ensure a proper installation.
By following this guide, you’ll be well-equipped to handle a starter motor replacement with confidence. Safe driving!