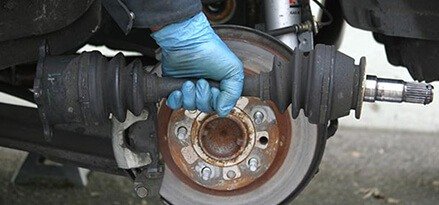
The Constant Velocity (CV) axle is a crucial component in front-wheel drive (FWD), all-wheel drive (AWD), and some rear-wheel drive (RWD) vehicles. It transfers power from the transmission to the wheels while allowing for suspension movement and steering angles. Over time, CV axles can wear out or become damaged, leading to drivability issues and potential safety hazards.
This comprehensive guide covers everything you need to know about CV axle replacement and repair services, including:
-
Signs of a failing CV axle
-
Causes of CV axle damage
-
Diagnosis and inspection methods
-
CV axle replacement process
-
Repair vs. replacement considerations
-
Cost of CV axle service
-
DIY vs. professional replacement
-
Preventive maintenance tips
By understanding these aspects, you can make informed decisions about maintaining or repairing your vehicle’s CV axles.
1. Signs of a Failing CV Axle
A damaged CV axle can exhibit several symptoms, including:
A. Clicking or Popping Noises When Turning
-
A loud clicking or popping sound when making sharp turns (especially at low speeds) is a classic sign of a worn-out CV joint.
-
This noise occurs because the damaged joint cannot maintain smooth rotation.
B. Grease Leakage from CV Boot
-
The CV boot is a rubber or thermoplastic cover that protects the joint from dirt and retains grease.
-
If the boot is torn or cracked, grease leaks out, leading to contamination and accelerated wear.
-
A visible grease splatter around the wheel or undercarriage indicates a compromised CV boot.
C. Vibration During Acceleration
-
A worn CV axle can cause excessive vibration, especially when accelerating.
-
This vibration may feel like a shuddering sensation coming from the front of the vehicle.
D. Knocking or Clunking Sounds
-
If the inner CV joint is damaged, you may hear a deep knocking or clunking noise when shifting gears or accelerating.
E. Difficulty Steering or Uneven Tire Wear
-
A severely damaged CV axle can affect steering responsiveness and cause uneven tire wear due to misalignment.
If you notice any of these symptoms, it’s essential to inspect and replace the CV axle before further damage occurs.
2. Causes of CV Axle Damage
Several factors contribute to CV axle failure, including:
A. Torn or Damaged CV Boot
-
The most common cause of CV joint failure is a split or torn boot, allowing dirt and moisture to enter.
-
Without lubrication, the joint wears out quickly.
B. Normal Wear and Tear
-
CV axles endure constant stress, especially in vehicles with high mileage.
-
Over time, the bearings and joints wear down.
C. Impact Damage (Potholes, Curbs, Off-Roading)
-
Hitting potholes, curbs, or rough terrain can bend the axle shaft or damage the CV joints.
D. Lack of Lubrication
-
If the CV boot leaks grease, the joint loses lubrication, leading to metal-on-metal grinding.
E. Poor-Quality Aftermarket Parts
-
Low-quality replacement axles may fail prematurely compared to OEM (Original Equipment Manufacturer) parts.
3. Diagnosis and Inspection of CV Axles
Before replacing a CV axle, a proper diagnosis is necessary. Here’s how mechanics check for issues:
A. Visual Inspection
-
Check for torn or leaking CV boots.
-
Look for grease splatter around the wheel hub or axle.
B. Test Drive for Noises
-
Listen for clicking when turning or clunking during acceleration.
C. Lift and Shake Test
-
With the vehicle lifted, grab the axle and check for excessive play or movement.
D. Check for Vibrations
-
A worn inner CV joint may cause vibrations under load.
If the CV axle is confirmed faulty, replacement is usually the best solution.
4. CV Axle Replacement Process
Replacing a CV axle involves several steps:
A. Tools Needed
-
Jack and jack stands
-
Lug wrench
-
Pry bar
-
Socket set
-
Ball joint separator (if needed)
-
Torque wrench
B. Step-by-Step Replacement
-
Lift the Vehicle – Secure the car on jack stands.
-
Remove the Wheel – Take off the wheel for access.
-
Disconnect the Axle Nut – Remove the large hub nut (may require an impact wrench).
-
Separate Suspension Components – Depending on the vehicle, you may need to disconnect:
-
Lower ball joint
-
Tie rod end
-
Control arm
-
-
Remove the Axle from the Transmission – Use a pry bar to gently pop the axle out of the differential.
-
Install the New CV Axle – Insert the new axle into the transmission and reassemble all components.
-
Tighten to Spec – Torque all bolts and the axle nut to manufacturer specifications.
-
Reinstall the Wheel and Lower the Vehicle – Test drive to ensure smooth operation.
5. Repair vs. Replacement: Which is Better?
A. When Can a CV Axle Be Repaired?
-
If only the CV boot is torn but the joint is still in good condition, a boot replacement kit can be used.
-
This involves cleaning, regreasing, and installing a new boot.
B. When Should the Entire Axle Be Replaced?
-
If the CV joint is worn, clicking, or grinding, a full axle replacement is necessary.
-
If the axle shaft is bent or damaged, replacement is the only option.
In most cases, full axle replacement is more cost-effective than rebuilding a damaged joint.
6. Cost of CV Axle Replacement
The cost varies depending on:
-
Vehicle make and model (luxury cars cost more)
-
OEM vs. aftermarket parts
-
Labor rates
A. Parts Cost
-
Aftermarket CV axle: $80 – $200
-
OEM CV axle: $200 – $500
B. Labor Cost
-
Mechanic labor: $150 – $300 per axle
-
Total cost (parts + labor): $230 – $800 per axle
Some shops offer lifetime warranties on replacement axles.
7. DIY vs. Professional Replacement
A. DIY Replacement (For Experienced Mechanics)
-
Pros: Saves money on labor.
-
Cons: Requires specialized tools; risk of improper installation.
B. Professional Replacement (Recommended for Most Drivers)
-
Pros: Guaranteed workmanship, warranty coverage.
-
Cons: Higher cost.
Unless you have mechanical experience, professional installation is recommended.
8. Preventive Maintenance Tips
To extend CV axle life:
✔ Inspect CV boots regularly for cracks or leaks.
✔ Avoid harsh driving over potholes and rough roads.
✔ Fix leaks immediately to prevent joint damage.
✔ Use high-quality replacement parts if a repair is needed.
Conclusion
A failing CV axle can lead to unsafe driving conditions and further damage to your vehicle. Recognizing the warning signs and addressing them promptly with a professional CV axle replacement or repair ensures smooth and safe operation.
If you suspect a CV axle issue, consult a trusted mechanic for an inspection and necessary repairs. Investing in quality parts and proper installation will save you money in the long run and keep your vehicle running reliably.
Need CV Axle Service?
If your vehicle is showing signs of CV axle failure, schedule an inspection today with a certified auto repair shop to avoid costly repairs down the road!