CV Joint Noise: Top Causes & How to Fix Them in Rancho Cucamonga Repair Shop
Introduction
Constant Velocity (CV) joints are crucial components of your vehicle’s drivetrain, allowing smooth power transfer from the transmission to the wheels while accommodating suspension movement. When CV joints wear out or get damaged, they produce distinct noises that signal the need for immediate attention.
If you’re in Rancho Cucamonga and notice clicking, popping, or grinding sounds when driving, your CV joints may be failing. This guide explores the top causes of CV joint noise and how professional auto repair shops in Rancho Cucamonga diagnose and fix these issues.
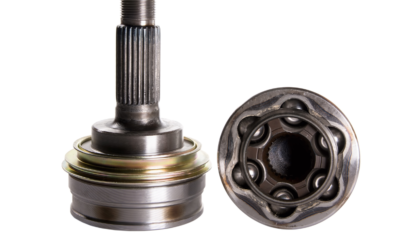
1. What Are CV Joints?
CV joints are part of the axle shaft assembly and come in two types:
- Inner CV Joints: Connect the transmission to the axle shaft.
- Outer CV Joints: Connect the axle shaft to the wheel hub.
They are protected by CV boots, which keep grease inside and contaminants out. When these boots tear, dirt and moisture enter, accelerating wear and causing noise.
2. Common Signs of a Bad CV Joint
Before diving into causes, recognize these symptoms:
- Clicking or popping noise when turning (especially common in outer CV joints)
- Grinding or vibration during acceleration (often from inner CV joints)
- Grease leakage around the wheel or under the car (torn CV boot)
- Shuddering or jerking when accelerating
If you notice these signs, visit a Rancho Cucamonga auto repair shop for inspection.
3. Top Causes of CV Joint Noise
A. Torn or Damaged CV Boot
Cause:
The CV boot is a rubber or thermoplastic cover that holds grease and protects the joint. When it cracks or tears, grease leaks out, and dirt enters, leading to:
- Metal-on-metal grinding
- Rapid joint wear
Solution:
- Replace the CV boot and repack the joint with grease (if caught early).
- If the joint is already damaged, replace the entire axle assembly.
B. Lack of Lubrication
Cause:
Without proper grease, the CV joint’s ball bearings and races wear out quickly, causing:
- Grinding or squeaking noises
- Increased friction and heat
Solution:
- Inspect and repack the joint with high-temperature CV grease.
- If wear is severe, replace the CV joint or axle.
C. Worn-Out CV Joint Bearings
Cause:
Over time, the bearings inside the CV joint wear down due to:
- High mileage
- Aggressive driving
- Poor maintenance
Symptoms:
- Constant clicking or popping, even when driving straight
- Vibration at high speeds
Solution:
- Replace the CV joint (often requires a whole axle replacement).
D. Corrosion or Rust Damage
Cause:
In areas with road salt or high humidity (like Rancho Cucamonga winters), CV joints can corrode, leading to:
- Stiff movement
- Grinding noises
Solution:
- Clean and lubricate if corrosion is minor.
- Replace the joint if rust has caused pitting or excessive wear.
E. Impact Damage from Potholes or Rough Roads
Cause:
Hitting potholes or curbs can:
- Bend axle shafts
- Crack CV joints
- Dislodge bearings
Symptoms:
- Loud clunking when shifting gears
- Uneven tire wear
Solution:
- Inspect the axle and CV joint for damage.
- Replace bent or broken components.
F. Improper Installation or Aftermarket Axle Issues
Cause:
Low-quality aftermarket axles or incorrect installation can lead to:
- Premature wear
- Excessive play in the joint
Solution:
- Use OEM or high-quality replacement axles.
- Ensure proper installation by a certified Rancho Cucamonga mechanic.
4. How to Diagnose CV Joint Noise
Mechanics in Rancho Cucamonga use these steps to diagnose CV joint issues:
Step 1: Visual Inspection
- Check for torn CV boots and grease leakage.
- Look for rust or physical damage to the axle.
Step 2: Test Drive
- Listen for clicking when turning (outer joint issue).
- Feel for vibration under acceleration (inner joint problem).
Step 3: Lift and Shake Test
- Lift the vehicle and shake the wheel to check for excessive play.
- Rotate the axle manually to detect grinding or roughness.
Step 4: Grease Check
- If the boot is intact but noise persists, inspect grease condition.
5. How to Fix CV Joint Noise
Option 1: CV Boot Replacement (Early Stage Fix)
If the joint is still good but the boot is torn:
- Remove the axle.
- Clean the CV joint.
- Install a new boot and repack with grease.
- Reinstall the axle.
Cost: 150−300 (cheaper than full axle replacement).
Option 2: CV Joint or Axle Replacement
If the joint is damaged:
- Remove the old axle.
- Install a new or remanufactured axle assembly.
- Ensure proper torque and alignment.
Cost: 300−800 (depending on vehicle and labor rates).
Option 3: Full Axle Shaft Replacement
In severe cases (bent axle or extreme wear):
- Replace the entire axle shaft.
Cost: 400−1,000+.
6. Preventing CV Joint Failure
To extend CV joint life:
✅ Inspect CV boots regularly (every oil change).
✅ Avoid harsh turns and rough roads when possible.
✅ Fix leaks immediately to prevent contamination.
✅ Use quality replacement parts (OEM or trusted aftermarket).
7. Why Choose a Rancho Cucamonga Auto Repair Shop for CV Joint Service?
Local shops offer:
🔧 Expert mechanics with CV joint experience.
🚗 Quality parts (OEM or premium aftermarket).
⏱ Fast service to get you back on the road.
💰 Competitive pricing compared to dealerships.
Conclusion
CV joint noises should never be ignored—they can lead to axle failure and unsafe driving conditions. If you hear clicking, grinding, or popping from your wheels, visit a trusted Rancho Cucamonga auto repair shop for a professional diagnosis and repair.
Need CV Joint Repair in Rancho Cucamonga?
📞 Call us today for a free inspection and estimate!
📍 Serving Rancho Cucamonga & surrounding areas.
By addressing CV joint issues early, you can avoid costly repairs and keep your vehicle running smoothly. Don’t wait—get your car checked today!