Your vehicle’s braking system is one of the most critical safety features on the road. When you press the brake pedal, your vehicle slows down or stops, protecting you, your passengers, and others. Front disc brakes play a major role in this process, as they provide most of the stopping power in modern vehicles. If your front disc brakes are failing or showing signs of wear, timely repair is essential to ensure safe driving.
This article dives deep into front disc brake repair—how these brakes work, common problems, how to inspect them, step-by-step repair instructions, tools required, safety considerations, and tips for extending the life of your brakes.
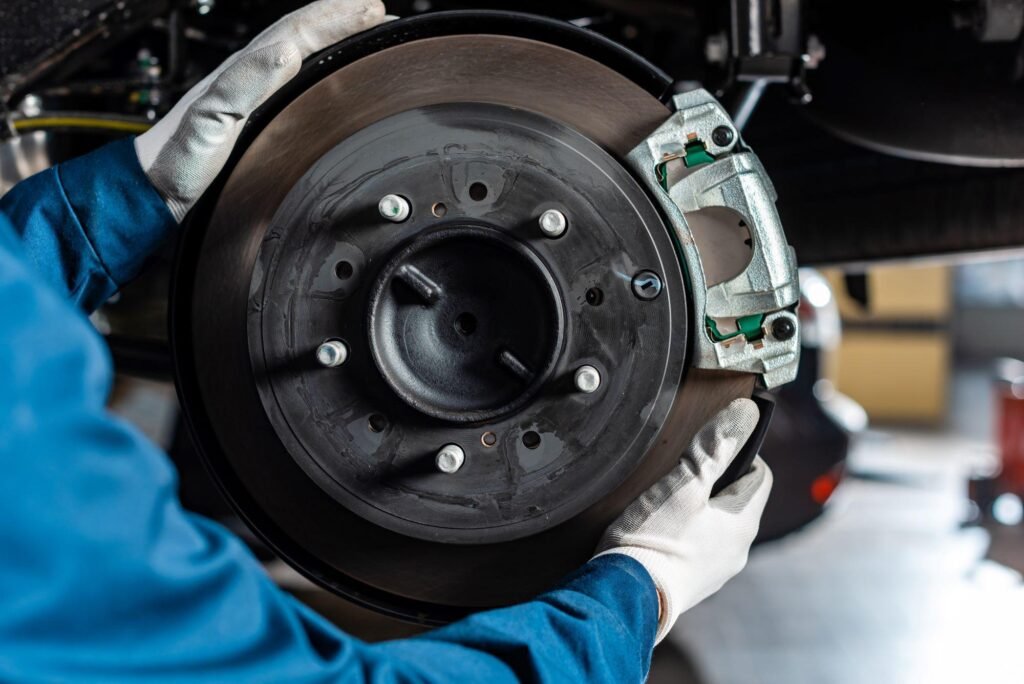
Understanding Front Disc Brakes
What Are Front Disc Brakes?
Disc brakes are a type of brake system where friction is applied to a rotating disc or rotor connected to the wheel. In front disc brakes, the rotor is mounted on the front wheel hubs. When you press the brake pedal, hydraulic pressure forces brake pads against the rotor, generating friction that slows the wheel.
Components of Front Disc Brakes
-
Brake Rotor (Disc): A flat, round metal disc attached to the wheel hub.
-
Brake Pads: Friction materials that squeeze against the rotor to create stopping power.
-
Caliper: A clamp-like device that houses the brake pads and pistons.
-
Pistons: Hydraulic cylinders inside the caliper that push the brake pads onto the rotor.
-
Brake Lines: Carry hydraulic fluid from the master cylinder to the calipers.
-
Master Cylinder: Converts brake pedal force into hydraulic pressure.
-
Brake Fluid: The medium that transmits force in the hydraulic brake system.
Why Are Front Brakes So Important?
Most vehicles have a front-heavy weight distribution, causing the front brakes to do about 60-70% of the stopping work. That means the front disc brakes experience more heat, friction, and wear, requiring regular inspection and maintenance.
Common Front Disc Brake Problems
Understanding symptoms can help you know when front disc brakes need repair.
1. Squealing or Screeching Noise
High-pitched noises usually indicate worn brake pads. Many pads have wear indicators that produce sound when pads are thin.
2. Grinding Noise
A harsh grinding noise means the brake pads are worn down completely, and metal backing is contacting the rotor—this can damage the rotor severely.
3. Vibration or Pulsation in the Brake Pedal
If the brake pedal vibrates or pulses under braking, the rotors may be warped or unevenly worn.
4. Pulling to One Side
If your car pulls left or right when braking, it can mean uneven pad wear, sticking calipers, or hydraulic problems.
5. Soft or Spongy Brake Pedal
This can indicate air in the brake lines, leaking brake fluid, or worn components.
6. Reduced Braking Performance
Longer stopping distances or brake fade indicate worn pads, rotors, or hydraulic issues.
Inspecting Front Disc Brakes
Tools Needed for Inspection
-
Jack and jack stands
-
Lug wrench
-
Flashlight
-
Digital caliper or ruler
-
Brake cleaner spray
Step-by-Step Inspection Process
-
Safety First: Park on a level surface, engage parking brake, and wear gloves and safety glasses.
-
Remove the Wheel: Loosen lug nuts, jack up the front of the vehicle, place jack stands, then remove the wheel.
-
Visual Inspection:
-
Look at the brake pads through the caliper. Pads less than 3 mm thick need replacement.
-
Inspect the rotor for grooves, scoring, cracks, or rust.
-
Check for uneven wear on pads or rotor surface.
-
Look for leaking brake fluid around caliper or brake lines.
-
Spin the rotor by hand; it should rotate smoothly without wobbling.
-
-
Measure Rotor Thickness: Use a digital caliper to measure rotor thickness at multiple points and compare with manufacturer minimum specs.
-
Check Caliper Movement: Ensure the caliper slides smoothly on its pins.
Front Disc Brake Repair: Step-by-Step
Now, let’s go through a detailed repair process for front disc brakes, including pad replacement and rotor resurfacing or replacement.
Tools and Materials Needed
-
Jack and jack stands
-
Lug wrench
-
Socket set and ratchet
-
C-clamp or brake caliper tool
-
Brake cleaner spray
-
Wire brush
-
Brake grease or anti-seize lubricant
-
New brake pads
-
New or resurfaced rotors (if needed)
-
Torque wrench
-
Rubber mallet (optional)
-
Brake fluid (optional, for topping off or bleeding)
-
Disposable gloves and safety glasses
1. Prepare Your Vehicle
-
Park on a flat, stable surface.
-
Engage the parking brake and block rear wheels.
-
Loosen lug nuts slightly before jacking up the car.
-
Jack up the front and support securely with jack stands.
-
Remove the front wheels.
2. Remove the Brake Caliper
-
Locate caliper mounting bolts on the backside.
-
Remove bolts using socket and ratchet.
-
Carefully lift the caliper off the rotor; don’t let it hang by the brake hose—support it with a piece of wire or rest it on a suspension component.
3. Remove Old Brake Pads
-
Slide out the old brake pads from the caliper bracket.
-
Note their orientation for installing new pads.
4. Inspect and Remove the Rotor (If Replacing or Resurfacing)
-
If the rotor is stuck, tap it gently with a rubber mallet to free it.
-
Remove any retaining screws or clips.
-
Take the rotor off the hub.
5. Prepare New Rotor (If Replacing)
-
Clean the rotor surface with brake cleaner to remove oil or protective coatings.
-
If resurfacing, have this done professionally or with a brake lathe to ensure smooth, even surface.
6. Install the Rotor
-
Slide the rotor onto the hub.
-
Replace any retaining screws or clips.
7. Compress the Caliper Piston
-
Use a C-clamp or brake caliper tool to push the piston back into the caliper bore.
-
This creates enough space for new, thicker brake pads.
8. Install New Brake Pads
-
Apply a thin layer of brake grease to the back of the pads and on the caliper bracket contact points.
-
Slide the new pads into the caliper bracket in the correct orientation.
9. Reinstall the Caliper
-
Place the caliper back over the rotor and pads.
-
Tighten the caliper mounting bolts to manufacturer torque specs.
10. Repeat on Other Side
-
Perform the same steps on the other front wheel.
11. Reinstall Wheels and Lower Vehicle
-
Put the wheels back on and hand-tighten lug nuts.
-
Lower the vehicle and torque lug nuts to manufacturer specifications.
12. Test and Break-In New Brakes
-
Pump the brake pedal several times to seat the pads against the rotor.
-
Perform a careful test drive to ensure braking feels firm and consistent.
-
Follow proper brake pad break-in procedures (also called bedding), usually involving moderate stops from low speeds.
Additional Front Disc Brake Repairs
Sometimes more extensive repairs are needed beyond just pads and rotors.
Caliper Replacement or Rebuild
-
Sticking or leaking calipers may require a rebuild kit or full replacement.
-
Caliper pistons can seize, causing uneven pad wear.
Brake Hose Replacement
-
Damaged or leaking brake hoses can reduce hydraulic pressure and braking power.
Brake Fluid Flush and Bleeding
-
Brake fluid can become contaminated or absorb moisture, reducing braking efficiency.
-
Bleeding the brakes removes air pockets that cause a spongy pedal.
Safety Tips When Repairing Front Disc Brakes
-
Always work on a stable, level surface with the vehicle securely supported on jack stands.
-
Wear safety glasses and gloves to protect against dust, debris, and brake fluid.
-
Avoid inhaling brake dust — use a mask or wet the brakes with brake cleaner before working.
-
Do not reuse old brake hardware unless it is in perfect condition.
-
Follow manufacturer torque specifications on all bolts.
-
Test drive carefully after repair, especially at low speeds first.
How to Extend the Life of Your Front Disc Brakes
Proper use and regular maintenance help extend brake component life:
-
Avoid harsh braking whenever possible; anticipate stops early.
-
Drive gently down hills, using engine braking to reduce wear.
-
Have brakes inspected regularly (every 10,000-15,000 miles).
-
Replace brake fluid every 2 years or per manufacturer recommendation.
-
Keep your wheels clean; road grime can accelerate corrosion.
-
Use high-quality brake pads suitable for your driving style.
When to Call a Professional
While many brake repairs can be done at home, some situations require professional expertise:
-
Complex ABS or electronic brake system issues.
-
Severe rotor damage needing machining.
-
Unusual brake noises after replacement.
-
Persistent brake pedal issues.
-
Lack of proper tools or confidence for DIY repairs.
Conclusion
Front disc brakes are vital for safe driving, and knowing how to diagnose and repair common problems can save money and prevent accidents. By understanding brake system components, performing routine inspections, and following step-by-step repair processes, you can maintain strong, reliable brakes on your vehicle.
Always prioritize safety, use the right tools, and consider professional help when needed. With proper care, your front disc brakes will keep your vehicle stopping smoothly and safely for many miles.