The heater hose is a crucial component of your vehicle’s cooling system, responsible for circulating hot coolant from the engine to the heater core, which then provides warm air to the cabin. Over time, heater hoses can deteriorate due to heat, pressure, and chemical exposure, leading to leaks or complete failure. Replacing a damaged heater hose is essential to prevent engine overheating and maintain proper cabin heating.
This guide will cover everything you need to know about heater hose replacement, including:
-
Signs of a Failing Heater Hose
-
Tools and Materials Needed
-
Step-by-Step Replacement Process
-
Tips for Preventing Future Issues
-
When to Seek Professional Help
By the end of this article, you’ll have a thorough understanding of how to replace a heater hose yourself or recognize when it’s time to consult a mechanic.
1. Signs of a Failing Heater Hose
Before replacing a heater hose, it’s important to identify whether it’s actually failing. Here are the most common symptoms:
A. Coolant Leaks
-
Puddles of coolant under the car (usually bright green, orange, or pink)
-
Visible dripping from the hose connections
B. Overheating Engine
-
If coolant isn’t circulating properly due to a leak or blockage, the engine may overheat.
C. No Heat in the Cabin
-
A clogged or leaking heater hose prevents hot coolant from reaching the heater core, resulting in cold air from the vents.
D. Soft, Swollen, or Cracked Hoses
-
Inspect hoses for:
-
Bulges or soft spots (indicating internal breakdown)
-
Cracks or dry rot (common in older hoses)
-
Corrosion at the hose clamps
-
E. Coolant Smell Inside the Car
-
A sweet, syrupy odor may indicate a leaking heater hose or heater core.
If you notice any of these signs, it’s time to inspect and possibly replace the heater hose.
2. Tools and Materials Needed
Before starting the replacement, gather the following:
Tools:
-
Screwdrivers (flathead and Phillips)
-
Pliers or hose clamp pliers
-
Utility knife or hose cutter
-
Drain pan
-
Funnel
-
Flashlight (for better visibility)
-
Gloves and safety glasses
Materials:
-
Replacement heater hose (ensure correct size and type for your vehicle)
-
New hose clamps (stainless steel or constant-tension clamps recommended)
-
Coolant (check your vehicle’s specifications for the right type)
-
Rags or paper towels for cleanup
Optional but Helpful:
-
Hose pick tool (for removing stubborn hoses)
-
Coolant system flush kit (if performing a full coolant change)
3. Step-by-Step Heater Hose Replacement Process
Step 1: Safety Precautions
-
Let the Engine Cool – Never work on a hot engine; coolant can be scalding.
-
Disconnect the Battery – Prevents accidental electrical shorts.
-
Work in a Well-Ventilated Area – Coolant fumes can be harmful.
Step 2: Drain the Coolant
-
Place a drain pan under the radiator.
-
Open the radiator drain valve or remove the lower radiator hose to drain coolant.
-
If only replacing a heater hose, you may only need to drain a small amount.
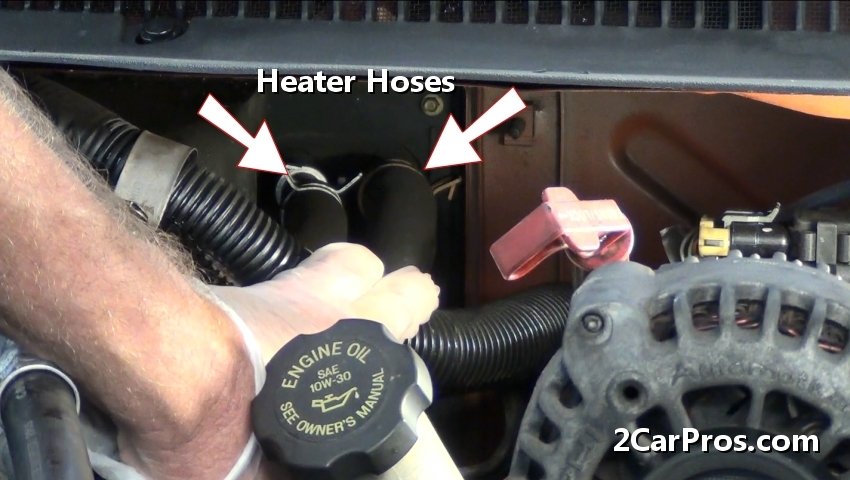
Step 3: Locate the Heater Hoses
-
Refer to your vehicle’s service manual if unsure.
-
Typically, two hoses run from the engine to the firewall (one for inlet, one for outlet).
Step 4: Remove the Old Hose
-
Loosen the hose clamps with pliers or a screwdriver.
-
Twist the hose gently to break the seal (avoid pulling forcefully to prevent damage).
-
If stuck, carefully cut it with a utility knife (avoid scratching the metal fittings).
Step 5: Install the New Hose
-
Slide new clamps onto the new hose before installation.
-
Lubricate the ends with a small amount of coolant for easier fitting.
-
Push the hose onto the fittings until it seats fully.
-
Tighten the clamps securely (but don’t overtighten, as this can damage the hose).
Step 6: Refill Coolant
-
Use a funnel to pour coolant into the radiator or overflow tank.
-
Start the engine and let it warm up to check for leaks.
-
Top off coolant as needed and bleed air from the system if required.
Step 7: Test the Heater
-
Turn on the heater to ensure warm air flows properly.
-
Check for leaks again after a short drive.
4. Tips for Preventing Future Heater Hose Issues
To extend the life of your heater hoses:
-
Inspect Hoses Regularly – Look for cracks, leaks, or soft spots during oil changes.
-
Replace Hoses Proactively – Most manufacturers recommend replacement every 4-5 years.
-
Use High-Quality Coolant – Avoid mixing different types, as this can cause corrosion.
-
Check Clamps Periodically – Ensure they’re tight but not crushing the hose.
-
Avoid Overheating – Engine overheating accelerates hose deterioration.
5. When to Seek Professional Help
While heater hose replacement is a manageable DIY task, consider professional assistance if:
-
The hose connections are extremely rusted or corroded.
-
You suspect a leaking heater core (requires dashboard removal).
-
You’re uncomfortable working with the cooling system.
A mechanic can also perform a pressure test to ensure no other leaks exist.
Conclusion
Replacing a heater hose is a straightforward repair that can save you from costly engine damage and keep your car’s heating system functioning properly. By recognizing the warning signs, using the right tools, and following proper installation steps, you can complete this job efficiently.
Regular maintenance and inspections will help prevent future failures, ensuring your vehicle stays reliable in all weather conditions. If in doubt, don’t hesitate to consult a professional mechanic for assistance.
By following this guide, you’ll keep your cooling system in top shape and enjoy a warm, comfortable ride for years to come.