The radiator hose is a critical component of your vehicle’s cooling system, responsible for transporting coolant between the engine and the radiator. Over time, radiator hoses can wear out, crack, or develop leaks, leading to overheating and potential engine damage. Replacing a faulty radiator hose is a relatively simple and cost-effective maintenance task that can prevent major engine problems.
In this guide, we’ll cover:
-
The function of radiator hoses
-
Signs of a failing radiator hose
-
Tools and materials needed for replacement
-
Step-by-step replacement instructions
-
Tips for maintaining your cooling system
By the end of this article, you’ll have a clear understanding of how to replace a radiator hose and keep your engine running smoothly.
1. Understanding Radiator Hoses
Types of Radiator Hoses
There are two main types of radiator hoses in most vehicles:
-
Upper Radiator Hose – Connects the top of the radiator to the engine’s thermostat housing.
-
Lower Radiator Hose – Connects the bottom of the radiator to the water pump.
Some vehicles also have additional coolant hoses, such as heater hoses or bypass hoses, but the upper and lower radiator hoses are the primary ones involved in coolant circulation.
Materials and Construction
Radiator hoses are typically made from reinforced rubber or silicone to withstand high temperatures and pressure. They often have an inner lining to resist coolant corrosion and an outer layer to protect against abrasion.
2. Signs of a Failing Radiator Hose
A failing radiator hose can lead to coolant leaks, overheating, and engine damage. Watch for these warning signs:
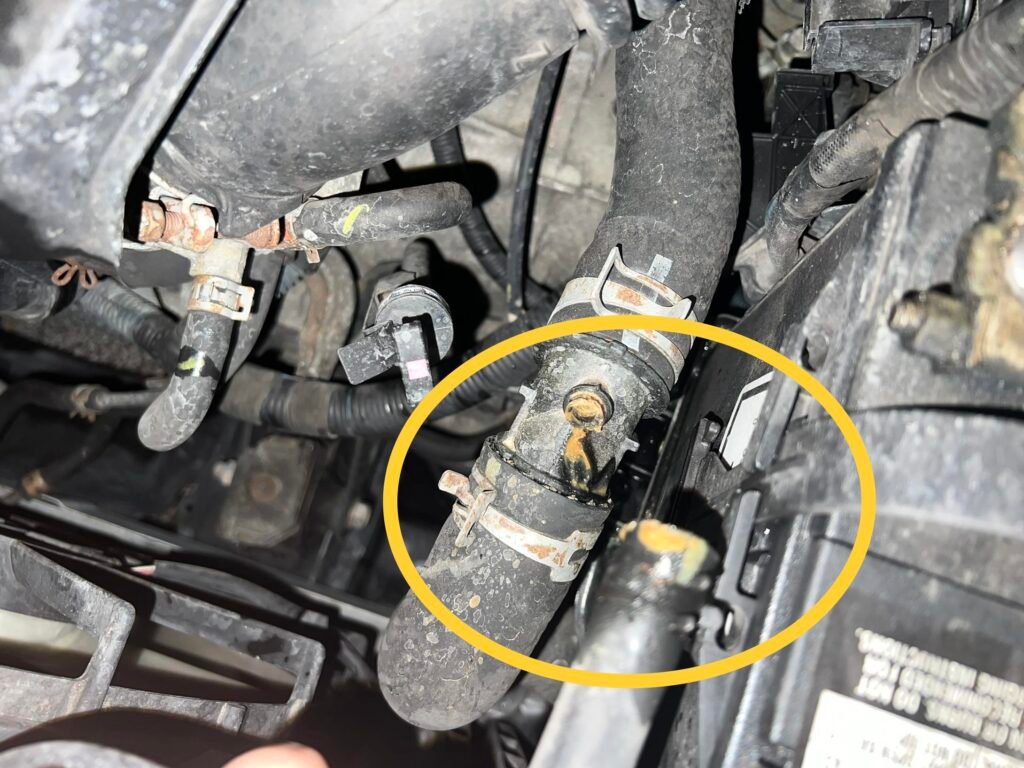
1. Visible Cracks or Bulges
Inspect the hoses for cracks, dry rot, or swelling. A bulging hose may indicate internal weakening and could burst under pressure.
2. Coolant Leaks
If you notice coolant puddles under your car or dampness around the hose connections, the hose may be leaking.
3. Soft or Spongy Hose
A healthy hose should be firm but flexible. If it feels overly soft or mushy, it may be deteriorating.
4. Overheating Engine
A collapsed or leaking hose can restrict coolant flow, causing the engine to overheat.
5. Steam or Sweet Smell
A ruptured hose can release steam and a sweet-smelling coolant odor from under the hood.
If you notice any of these symptoms, inspect the hoses immediately and replace them if necessary.
3. Tools and Materials Needed for Replacement
Before starting, gather the following tools and supplies:
-
New radiator hose(s) (ensure correct fit for your vehicle)
-
Screwdrivers (flathead and Phillips)
-
Pliers or hose clamp tool
-
Drain pan
-
Coolant (check your vehicle’s specifications)
-
Funnel
-
Gloves and safety glasses
-
Rag or shop towels
Optional but helpful:
-
Jack and jack stands (if needed for access)
-
Hose pick or small pry tool (for stubborn hoses)
4. Step-by-Step Radiator Hose Replacement
Step 1: Safety Precautions
-
Let the Engine Cool – Never work on a hot engine; coolant can be scalding.
-
Disconnect the Battery (optional but recommended for safety).
Step 2: Drain the Coolant
-
Place a drain pan beneath the radiator.
-
Open the radiator drain plug or remove the lower hose to drain coolant.
-
Dispose of old coolant properly (it is toxic to animals and the environment).
Step 3: Remove the Old Hose
-
Locate the hose clamps (either spring clamps or screw clamps).
-
Use pliers or a screwdriver to loosen and slide off the clamps.
-
Twist the hose gently to break the seal, then pull it off. If stuck, carefully use a hose pick.
Step 4: Install the New Hose
-
Clean the radiator and engine connections to ensure a proper seal.
-
Slide the clamps onto the new hose before fitting it.
-
Push the hose onto the fittings securely.
-
Position and tighten the clamps to prevent leaks.
Step 5: Refill Coolant
-
Close the radiator drain plug.
-
Refill the system with the correct coolant type.
-
Start the engine and check for leaks.
-
Top off coolant as needed and bleed air from the system if required.
Step 6: Test Drive and Final Check
-
Take a short drive and monitor the temperature gauge.
-
Recheck hose connections for leaks afterward.
5. Tips for Maintaining Your Radiator Hoses
To extend the life of your radiator hoses:
-
Inspect them regularly (every oil change or 6 months).
-
Replace hoses every 4-5 years, even if they look fine.
-
Use high-quality coolant to prevent internal corrosion.
-
Avoid excessive pressure by ensuring the radiator cap is functioning properly.
6. Common Mistakes to Avoid
-
Reusing old clamps – Worn clamps may not seal properly.
-
Forcing hoses on – This can damage the fittings.
-
Ignoring other cooling system issues – Check the thermostat, water pump, and radiator for problems.
-
Mixing incompatible coolants – Always use the manufacturer-recommended type.
Conclusion
Replacing a radiator hose is a straightforward DIY task that can save you from costly engine repairs. By recognizing the signs of a failing hose, using the right tools, and following proper installation steps, you can ensure your cooling system operates efficiently. Regular maintenance and inspections will help prevent unexpected breakdowns and keep your engine running at optimal temperatures.
If you’re unsure about the replacement process, consult a professional mechanic. Otherwise, with this guide, you’re well-equipped to tackle radiator hose replacement with confidence!